In previous article, we built a basic game analytics dashboard using JavaScript, visualizing static player data like scores and achievements. That was a solid start, but now it’s time to take things further.
What if we could go live?
Today, we’re pushing that concept further. Instead of showing outdated stats, we’ll build a real-time game event dashboard that updates automatically as the game progresses, just like how you’d track your favorite League of Legends team’s minion count, KDA, and gold lead during a live match.
GitHub repo for this project is here.
The Goal
My goal is to build a real-time KDA dashboard similar to what you see in esports broadcasts. It will feature two tables: one for the Blue team and one for the Red team, each displaying five players and their respective Kills, Deaths, and Assists.
To power this dashboard, I’ll create a server that simulates game events. The server will generate a random number between 0 and 10. If the number is greater than 5, it will simulate a kill event where:
- A randomly selected player gets a kill
- A randomly selected teammate receives an assist
- A randomly selected enemy player is marked as dead
These events will be sent in real-time to the client dashboard via WebSocket.
Preparing to Start
Let’s start with the project structure. I created a main folder named KDAL, which stands for Kill Death Assist Live; yeah, simple, anyway.
/kdal
  ├── src/
  │   ├── index.html
  │   ├── style.css
  │   └── main.js
├── server.jsInside that, I added a src folder to keep the front-end files: index.html, style.css, and main.js. The server.js file will remain in the root directory of the project.
Frontend 101
This part is the dashboard UI. We’ll have two tables, Red Team and Blue Team, and each row will update in real time. Like we talked before.
<!DOCTYPE html>
<html lang="en">
<head>
  <meta charset="UTF-8" />
  <title>Esports KDA Dashboard</title>
  <link rel="stylesheet" href="style.css" />
</head>
<body>
  <h1>Real-Time KDA Dashboard</h1>

  <div class="teams">
    <div class="team">
      <h2>Red Team</h2>
      <table id="red-team">
        <thead>
          <tr><th>Player</th><th>K</th><th>D</th><th>A</th></tr>
        </thead>
        <tbody></tbody>
      </table>
    </div>
    <div class="team">
      <h2>Blue Team</h2>
      <table id="blue-team">
        <thead>
          <tr><th>Player</th><th>K</th><th>D</th><th>A</th></tr>
        </thead>
        <tbody></tbody>
      </table>
    </div>
  </div>

  <script src="main.js"></script>
</body>
</html>Quick recap what we did here: We defined a title (so interesting..) later a huge heading 1 text so let people what they will see in here. and 2 simple table to visualise data.
body {
  font-family: sans-serif;
  background-color: #0e0e0e;
  color: #fff;
  padding: 20px;
  text-align: center;
}

.teams {
  display: flex;
  justify-content: space-around;
}

.team table {
  width: 300px;
  border-collapse: collapse;
  margin-top: 10px;
}

th, td {
  border: 1px solid #333;
  padding: 8px;
  text-align: center;
}

.red-team {
  background-color: #330000;
}

.blue-team {
  background-color: #001f33;
}Here comes the CSS to make everything look even better.
const players = [];

for (let i = 1; i <= 10; i++) {
  players.push({
    id: `Player${i}`,
    team: i <= 5 ? 'Red' : 'Blue',
    kills: 0,
    deaths: 0,
    assists: 0
  });
}

const playerMap = {};
players.forEach(p => playerMap[p.id] = p);

function renderTable() {
  const redBody = document.querySelector('#red-team tbody');
  const blueBody = document.querySelector('#blue-team tbody');
  redBody.innerHTML = '';
  blueBody.innerHTML = '';

  players.forEach(p => {
    const row = document.createElement('tr');
    row.innerHTML = `<td>${p.id}</td><td>${p.kills}</td><td>${p.deaths}</td><td>${p.assists}</td>`;
    if (p.team === 'Red') redBody.appendChild(row);
    else blueBody.appendChild(row);
  });
}

const ws = new WebSocket('ws://localhost:8080');

ws.onmessage = (msg) => {
  const event = JSON.parse(msg.data);
  const killer = playerMap[event.killer];
  const assist = playerMap[event.assist];
  const victim = playerMap[event.victim];

  killer.kills++;
  assist.assists++;
  victim.deaths++;

  renderTable();
};

renderTable();Okay, now that we have our client-side JavaScript set up, let’s pause for a moment and break down what we’ve actually done here.
First, we created an array to hold all the player objects. Then, using a simple for loop, we divided those players into two teams: Red and Blue. This setup helps us organize the players and render them into two separate tables based on their team.
Next, we dynamically rendered the HTML table rows using the player data, so each player’s Kill, Death, and Assist stats appear in the correct team section.
We also implemented a WebSocket connection that listens to port 8080. This allows the client to receive real-time updates from the server.
Whenever the server pushes new events (like a kill, assist, or death), the client listens to those events and updates the relevant player stats on the dashboard immediately.
Building Server
Maybe we can call it a “fake” server, but it functions like a real one, so let’s just call it a server.
npm init -y
npm install wsYou are now ready to go!
const WebSocket = require('ws');
const wss = new WebSocket.Server({ port: 8080 });

const players = Array.from({ length: 10 }, (_, i) => ({
  id: `Player${i + 1}`,
  team: i < 5 ? 'Red' : 'Blue'
}));

function getRandomPlayer(team = null) {
  const filtered = team
    ? players.filter(p => p.team === team)
    : players;
  return filtered[Math.floor(Math.random() * filtered.length)];
}

setInterval(() => {
  const rng = Math.floor(Math.random() * 11);

  if (rng > 5) {
    const killer = getRandomPlayer();
    const assist = getRandomPlayer(killer.team);
    const enemyTeam = killer.team === 'Red' ? 'Blue' : 'Red';
    const victim = getRandomPlayer(enemyTeam);

    const event = {
      killer: killer.id,
      assist: assist.id,
      victim: victim.id
    };

    wss.clients.forEach(client => {
      if (client.readyState === WebSocket.OPEN) {
        client.send(JSON.stringify(event));
      }
    });

    console.log(`[EVENT] ${killer.id} killed ${victim.id} with help of ${assist.id}`);
  }
}, 2000);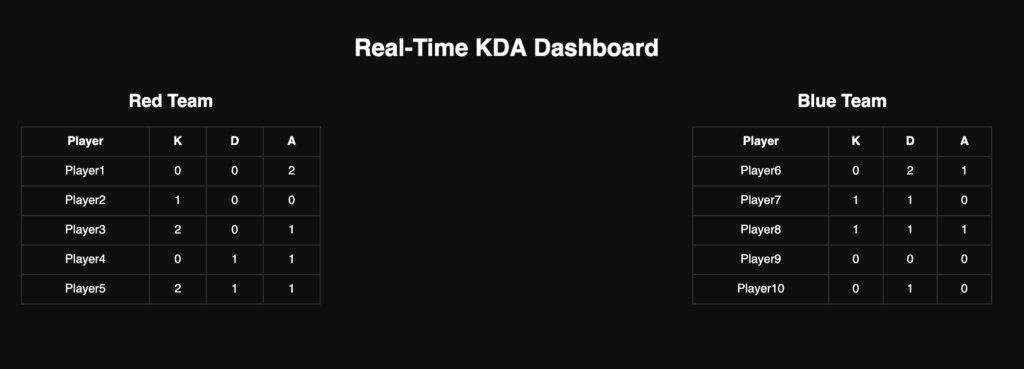
I agree, the logic has some flaws. Sometimes a player might get an assist for their own kill, which doesn’t really make sense. But hey, that’s not our focus right now.
What really matters is this: now, we have a live dashboard, and hell yeah, it works!
But… it’s kind of ugly, isn’t it? I think we can definitely make it look better with a bit of CSS polishing.
Updating Frontend
In this part we will update our frontend without any change in HTML but just CSS file.
* {
  box-sizing: border-box;
  margin: 0;
  padding: 0;
}

body {
  font-family: -apple-system, BlinkMacSystemFont, "Segoe UI", Roboto, Oxygen,
    Ubuntu, Cantarell, "Open Sans", "Helvetica Neue", sans-serif;
  background-color: #0e0e0e;
  color: #fff;
  padding: 40px 20px;
  text-align: center;
  min-height: 100vh;
  display: flex;
  flex-direction: column;
  align-items: center;
}

h1 {
  font-weight: 700;
  font-size: 2.5rem;
  margin-bottom: 40px;
  letter-spacing: 1.5px;
  user-select: none;
}

.teams {
  display: flex;
  justify-content: center;
  gap: 48px;
  flex-wrap: wrap;
  width: 100%;
  max-width: 900px;
}

.team {
  width: 320px;
  background-color: transparent;
  border-radius: 16px;
  padding: 24px 0 32px;
  transition: transform 0.2s ease;
}

.team:hover {
  transform: scale(1.03);
}

.team h2 {
  font-size: 1.6rem;
  font-weight: 600;
  margin-bottom: 24px;
  color: #ddd;
  user-select: none;
  text-transform: uppercase;
  letter-spacing: 1.2px;
}

.team table {
  width: 100%;
  border-collapse: separate;
  border-spacing: 0;
  border-radius: 12px;
  overflow: hidden;
  font-weight: 500;
  font-size: 1rem;
  color: #fff;
  border: none;
  background-color: transparent;
}

.team thead th {
  padding: 14px 12px;
  font-size: 0.95rem;
  text-transform: uppercase;
  letter-spacing: 1.1px;
  user-select: none;
  border-bottom: 1px solid rgba(255, 255, 255, 0.15);
}

.team tbody td {
  padding: 14px 12px;
  border-bottom: 1px solid rgba(255, 255, 255, 0.07);
  transition: background-color 0.15s ease;
}

.team tbody tr:last-child td {
  border-bottom: none;
}

#red-team {
  background-color: #ff3b30;
  border-radius: 12px;
  color: #fff;
  box-shadow: none;
}

#red-team thead th {
  background-color: #d32f2f;
  font-weight: 600;
  border-bottom: none;
}

#red-team tbody td {
  background-color: #ff4f4f;
}

#red-team tbody tr:hover td {
  background-color: #ff6a6a;
  cursor: default;
}

#blue-team {
  background-color: #007aff;
  border-radius: 12px;
  color: #fff;
  box-shadow: none;
}

#blue-team thead th {
  background-color: #005ecb;
  font-weight: 600;
  border-bottom: none;
}

#blue-team tbody td {
  background-color: #3399ff;
}

#blue-team tbody tr:hover td {
  background-color: #66b3ff;
  cursor: default;
}And after polishing here how it looks like:
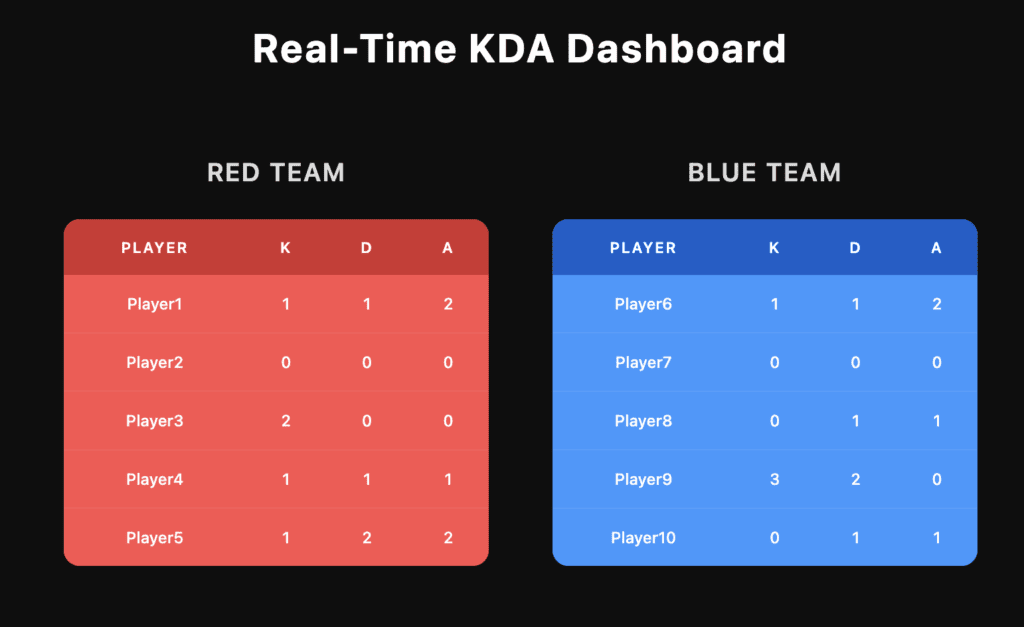
Looks way better and could be improved more, but we hit the target we wanted (the main point is still the server).
Conclusion
Voilà, we have a real-time KDA system, more or less. In reality, this is how servers work for your esports matches.
Of course, they don’t generate fake data like we do; instead, they gather data directly from the game and feed it into dashboards.
I think this is enough for the article. I hope you liked it (and if you don’t, that’s okay).
I’m no freakin’ angel!