
Welcome to the first chapter of Connection Between Client and Server and also the first post on this blog.
Before we dive in, two things worth knowing: my tone and how I structure articles.
Tone: I keep things relaxed most of the time, but when we get into technical territory you’ll notice the writing gets sharper and more precise. That’s intentional!
Structure: Most articles will cover concepts through three lenses: diagrams to show how something works visually, text to explain the concept clearly, and scripting where applicable to show how it looks in actual code. I’ll be using C++ and Python depending on what fits best.
TCP/IP Handshake
Before any data moves, both the client and server need to confirm they can reach each other. That confirmation process is called the handshake, both sides complete it before establishing the connection.
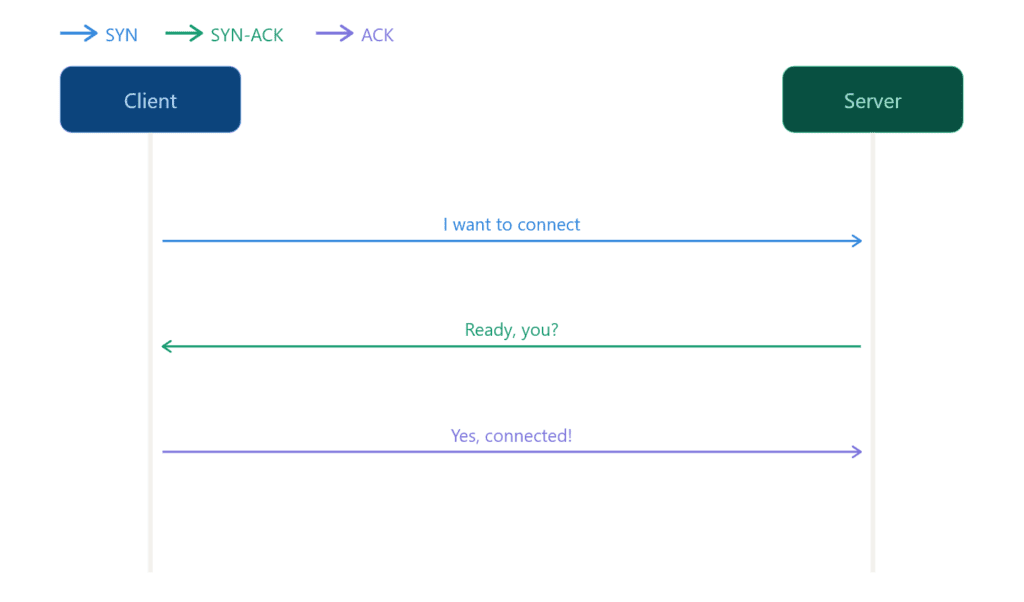
There are three steps:
- SYN (Synchronize): The client initiates the connection by sending its sequence number and signaling it wants to sync.
- SYN-ACK (Synchronize – Ackowledge): The server responds by acknowledging the client’s sequence number and sending back its own.
- ACK (Ackowledge): the client confirms, completing the exchange
If all three steps succeed the connection is established and data transfer can begin. If any step fails the server rejects the connection.
SYN Step
SYN is the first step in establishing a TCP connection. I’m using Python for this section because the code stays readable and the concept comes through without unnecessary complexity.
from scapy.all import *Before creating raw packets in Python, you’ll need to install Scapy; a library that lets you craft and send packets at the TCP layer directly.
To install:
pip install scapy# example.com
ip = "93.184.216.34"
port = 80For this script we’ll keep it simple: just a client sending a SYN to an existing server. We’re not building a server yet, that comes later. For now we just need a target IP and port to send our packet to.
Port 80 might be closed on some servers: try port 443 (HTTPS) if you get no response. Also make sure you have permission to test against any IP address you use. Do not run this against servers you do not own or have explicit authorization to probe.
# Building SYN packet
syn = IP(dst=ip) / TCP(dport=port, flags="S")Here we construct the packet. dst is the destination IP address, dport is the port we’re targeting, and flags="S" tells TCP this is a SYN packet; the S stands for SYN.
Here you might notice the / operator, in Python this normally means division, but Scapy overrides it for its own purpose. When used between packet layers it means “stack this layer on top of that one.” So IP(...) / TCP(...) is not division, it’s wrapping a TCP layer inside an IP packet.
Don’t worry about TCP layers or ports for now, that’s going to be covered in the next article.
# Send and recieve the response
response = sr1(syn, timeout=2, verbose=0)sr1 sends the packet and waits for a single response back. We pass it three things: the SYN packet we just crafted, timeout=2 to stop waiting after 2 seconds if nothing comes back, and verbose=0 to silence Scapy’s default output which would otherwise flood the terminal with packet details we don’t need.
if response:
if response[TCP].flags == "SA":
print("SYN-ACK received!")
elif response[TCP].flags == "R":
print(f"RST received! Port {port} is closed")
else:
print("No response!")Once we receive a response we check the TCP flag it carries. If it’s SA (SYN-ACK) the server is reachable and ready. If it’s R (RST) the target port is closed.
RST stands for Reset. It’s a TCP flag the server sends back to immediately terminate a connection attempt, basically a hard rejection.
Now we know how to send a SYN packet to initiate a connection.
Port Scanning
It’s a bit outside our scope for now but worth mentioning, the same SYN packets we just covered are the foundation of port scanning.
The idea is simple: send a SYN to a port, if SYN-ACK comes back the port is open, if RST comes back it’s closed.
Port scanners like Nmap do exactly this, they never complete the handshake. Instead of replying with ACK they send RST to kill the interaction immediately. We’ll get into that in the ACK step.
A port scanner doesn’t need a full connection, that’s why Nmap kills it after SYN-ACK. Dropping the handshake early means it can scan ports faster without the overhead of establishing full connections.
If you iterate through ports and send a SYN to each one you have a basic port scanner, but it’ll be much slower than Nmap. Nmap is written in C++ and handles raw packet operations at a level Python simply can’t match in terms of speed.
SYN-ACK Step
Now we’re on the second step: SYN-ACK. This is the server’s response to the client’s SYN, essentially saying “I received you, I’m ready.”
To demonstrate this we need to flip sides and act as the server. Think of the SYN script as what runs on the client machine, now we need something on the server side that listens for incoming connections and responds back. Same idea as a web server waiting for requests.
import socket
port = 9999For the server side we are using Python’s socket library: it’s easier to manage and far more reliable than Scapy for handling incoming connections. Trust me on this one.
We start by defining the port we want to listen on. We’re using 9999 which should be free on most machines.
server = socket.socket(socket.AF_INET, socket.SOCK_STREAM)
server.bind(("0.0.0.0", port))
server.listen(1)
print(f"Listening on port {port}...")Here we create the server socket. socket.AF_INET means we are using IPv4 and socket.SOCK_STREAM means we are using TCP.
Then we bind it to all available network interfaces on our port with 0.0.0.0 and tell it to listen for incoming connections.
The 1 in listen(1) is the backlog, how many connections can wait in queue before the server starts refusing them.
conn, addr = server.accept()
print(f"Connection received from {addr}")
conn.close()accept() blocks and waits until a client connects; once it does it returns two things, the connection object and the client’s address.
Under the hood
server.accept()handles the SYN-ACK automatically, the OS takes care of it at the network stack level without you having to craft it manually.
We print the address so we can see who connected and then close the connection cleanly.
conn is the connection object. It represents the active connection with the client. You use it to send and receive data. However we do not need to send anything so we didn’t use the conn object in the script.
And addr is a tuple containing the client’s IP address and port number.
Run server.py first, then update the target IP in the client script to your machine’s local IP address. Keep the port as 9999.
As always: only test on machines you own or have explicit permission to use.
ACK Step
Back to the client side to complete the handshake. All we need to do here is send an ACK back to the server – that’s the final step.
from scapy.all import *
# example.com
ip = "93.184.216.34"
port = 9999
# Building SYN packet
syn = IP(dst=ip) / TCP(dport=port, flags="S")
# Send and recieve the response
response = sr1(syn, timeout=2, verbose=0)
if response:
if response[TCP].flags == "SA":
print("SYN-ACK received!")
# Step 2: Send ACK
ack = IP(dst=ip) / TCP(
sport=response[TCP].dport,
dport=port,
flags="A",
seq=response[TCP].ack,
ack=response[TCP].seq + 1
)
send(ack, verbose=0)
print("Handshake completed!")
elif response[TCP].flags == "R":
print(f"RST received! Port {port} is closed")
else:
print("No response!")We’ve extended client.py with the final step. The ACK is a TCP packet wrapped in an IP layer, sent back to the server to confirm the connection. Once the server receives it the handshake is complete.
Note: The client sends the ACK and assumes the handshake is complete, there’s no explicit confirmation that the server received it.
TCP handles this with a timeout. If the server doesn’t receive the ACK it retransmits the SYN-ACK and waits again. If enough retransmits fail the connection is dropped entirely.
So when the ACK is sent TCP assumes the connection is established. And most of the time it’s right, but not always.
That wraps up the three-way handshake: SYN, SYN-ACK, ACK. We now know what each step does, why it exists, and how to implement it from both sides.
Before we wrap up let’s look at what happens when the handshake doesn’t go as planned.
What Happens When the Handshake Fails?
There are a few scenarios where the handshake fails:
RST (Reset): the server is reachable but the port is closed or actively rejecting the connection.
No response or timeout: the host is down, the IP is wrong, or a firewall is silently dropping the packet.
Connection refused: nothing is running on that port, the OS rejects it immediately.
Incomplete handshake: SYN is sent, SYN-ACK comes back but ACK is never sent. The connection stays half-open until the server times it out.
Incomplete handshake is also the basis of a SYN flood attack, sending thousands of SYNs without completing the handshake to exhaust the server’s connection queue. And as we mentioned earlier, it’s the same mechanism port scanners use.
Python Sockets vs Python Scapy
This section exists to explain why we used sockets instead of Scapy for the server. I’m sure some of you were already questioning it.
Scapy gives you full control over raw packets. You decide every field; flags, sequence numbers, ports. It’s the right tool when you need to see and manipulate what happens at the packet level, which is exactly why we used it on the client side to craft and send SYN and ACK packets manually.
Scapy is not great on the server side, and honestly not ideal on the client side either, but we used it specifically to examine and craft SYN and ACK packets at the raw level. There are ways to make it work as a server but they’re either overly complicated or the OS starts rejecting packets, especially on Windows where it becomes a genuine nightmare.
If you tried using Scapy on the server side you’ve probably run into a common problem: RST packets. The OS sees incoming traffic it didn’t initiate and rejects it as unsolicited. On Linux you can suppress this with firewall rules like iptables but on Windows it’s far more restricted and not worth the fight.
That’s why I made the decision to use sockets for the server side. We already covered SYN and ACK at the raw packet level so you have the concept, and SYN-ACK follows the exact same logic, just with the flag set to SA instead.
Socket is Python’s built-in networking library and it works at a higher level. You don’t craft packets manually, the OS handles that for you. It’s reliable, works on every platform without extra dependencies, and is the standard way to build networked applications. That’s why we used it for the server.
The tradeoff is visibility. Because the OS manages the packets for you, we didn’t get to see the SYN-ACK being crafted manually, it just happens under the hood. But for a server that’s fine. You want it clean and reliable, not something you’re constantly fighting.
Conclusion
The TCP/IP handshake is a fundamental concept in networking but there’s more ground to cover around it.
For today we covered how your device and a server confirm that a connection is reliable before any data moves. Two side articles are coming, “Behind the Handshake: TCP and IP Protocols” , and “OSI Model: 7 Layers of a Network Connection“.
The next main chapter in the Connection Between Client and Server series will be Packet Flow, that article will show what happens next after the handshake.
This article ended up over 2000 words but I believe every part of it is worth reading. It’s written for complete beginners while still assuming some basic technical familiarity. More scripting focused articles are also planned to support the concepts covered here.
All lab files ,the client and server Python scripts, are available on my GitHub. Go ahead and test them on your own machine. Feel free to check out my other repos while you’re there.