Once the TCP handshake completes, data begins to flow between machines. This article breaks down how that data moves across the network using the TCP protocol.
Packet flow is handled by two protocols: TCP and UDP. This article covers TCP; UDP will be covered next.
Prerequisites: Familiarity with the TCP/IP transport layer and basic socket scripting. If you need a refresher, check out the TCP/IP protocols article and the TCP/IP handshake guide before continuing.
Network Connection
A connection is just a mutual agreement between two devices, both sides keep track of the same conversation so they can exchange data in a structured way.
TCP is connection-oriented. Before any data moves, it does a handshake to establish that connection, and then maintains state on both sides to make sure data arrives reliably and in order.
UDP is the opposite. No handshake, no shared state, no guarantees. It just sends data without questioning.
The important thing to understand here is that a connection doesn’t mean the two devices are constantly talking back and forth in real time. It just means both sides are holding onto the same protocol state and updating it as data flows through.
Client and Server Roles in TCP
In Transmission Control Protocol, “client” and “server” don’t describe different kinds of machines, they describe roles in how a connection starts and is managed.
The client is the side that initiates the connection. It reaches out to a specific address and port, asking to start a conversation.
The server is the side that listens for incoming connections on a known port and responds to those requests.
Once the connection is established, the distinction mostly fades. Both sides can send and receive data, TCP itself is full-duplex. The only real difference is who made the first move.
The TCP Handshake
The TCP handshake is the first step in establishing a connection. It is used to initiate communication and confirm that a connection can be successfully established between two devices.
The TCP handshake is covered in detail in a separate article, so it will not be explained again here.
To refresh our memory, the basic sequence is SYN → SYN-ACK → ACK. The client first sends a SYN packet to the server, indicating a request to establish a connection. The server responds with a SYN-ACK packet, acknowledging the request and indicating readiness to connect. Finally, the client sends an ACK packet to confirm the connection has been established.
Data Transmission
This is what we will cover in this article: what TCP does after the handshake is completed. Unlike UDP, TCP does not simply send data as it is received; instead, it processes and manages the data before transmitting it.
Breaking Data into Packets
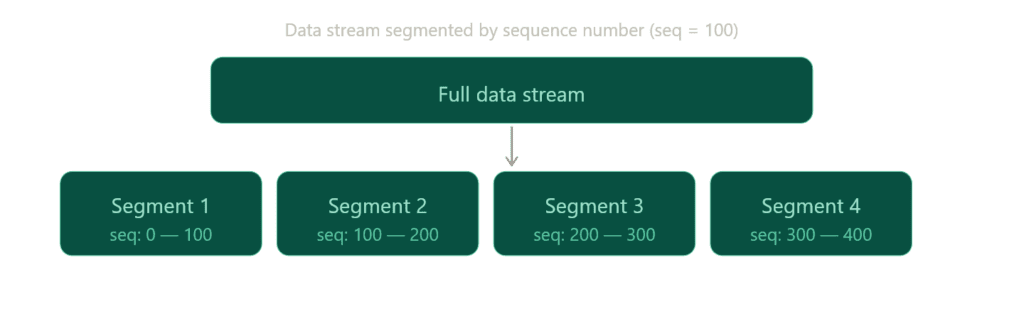
TCP protocol breaks data into smaller portions. These smaller packets are called segments, and each segment carries a sequence number that helps indicate its position within the overall data stream.
For example, a sequence number of 100 does not mean “100 bits per packet.” Instead, it refers to the byte position in the stream. If a segment starts at sequence number 100, it means that segment begins at byte 100 of the data stream, not that it contains a fixed amount of data.
So, if the first segment contains bytes 0–99, the next segment would typically start at byte 100 and continue onward, depending on the segment size.
For example, to send 1 MB of data, TCP will split it into multiple segments based on factors such as the Maximum Segment Size (MSS) and network conditions. You do not manually set the sequence number to control packet size (can manipulate tho); instead, TCP dynamically determines how much data fits into each segment. The last segment may be smaller if there is not enough remaining data to fill it.
This is the first step in TCP data flow: breaking data into smaller pieces to ensure reliable and efficient transmission across the network.
Transmission
After TCP splits the data into segments, the next step is actually sending them over the network and making sure nothing gets lost or corrupted along the way.
TCP passes segments to the IP protocol, which is responsible for moving data between machines using IP addresses.
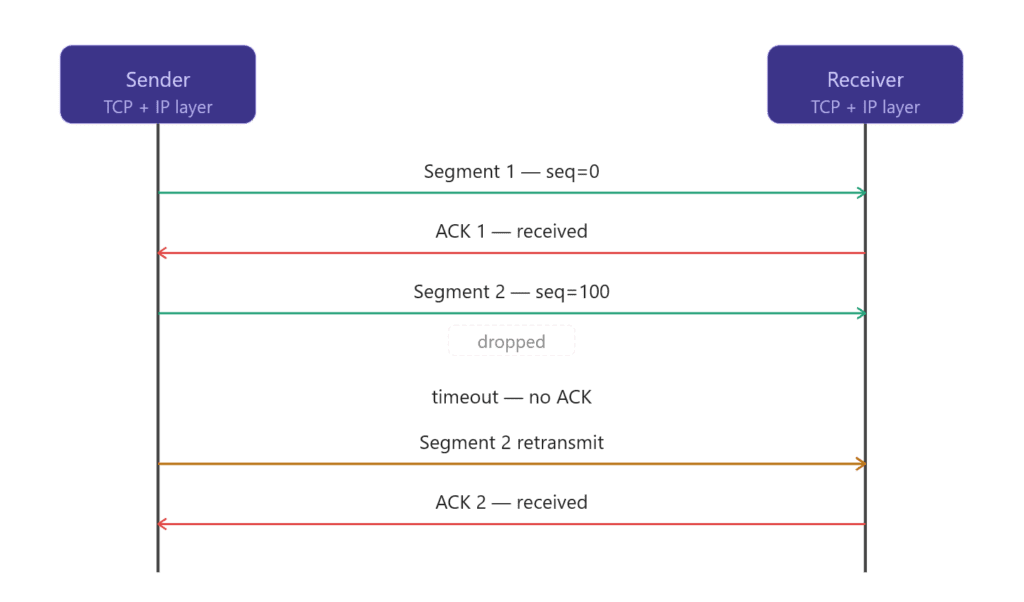
TCP then starts tracking each segment using internal state. For every segment that is sent, TCP expects an acknowledgment (ACK) from the receiver. This ACK confirms that the data was received successfully.
If an ACK does not arrive within a certain time, TCP assumes the segment was lost and retransmits it again. This is how TCP ensures reliability even when packets are dropped, delayed, or arrive out of order.
At the same time, TCP also controls how fast data is sent using flow control and congestion control. This prevents overwhelming the receiver or the network.
So in this stage, TCP is basically doing three things: sending segments, waiting for confirmation, and resending anything that didn’t make it.
Encapsulation
You can find this in the TCP/IP protocols article, but let’s summarize it once more.
We said that TCP sends data through the IP protocol, and IP is responsible for moving that data between machines.
But how does this actually work? How can TCP pass data down to IP (from the transport layer to the network layer), and how do other layers do the same?
This is possible because of encapsulation and decapsulation.
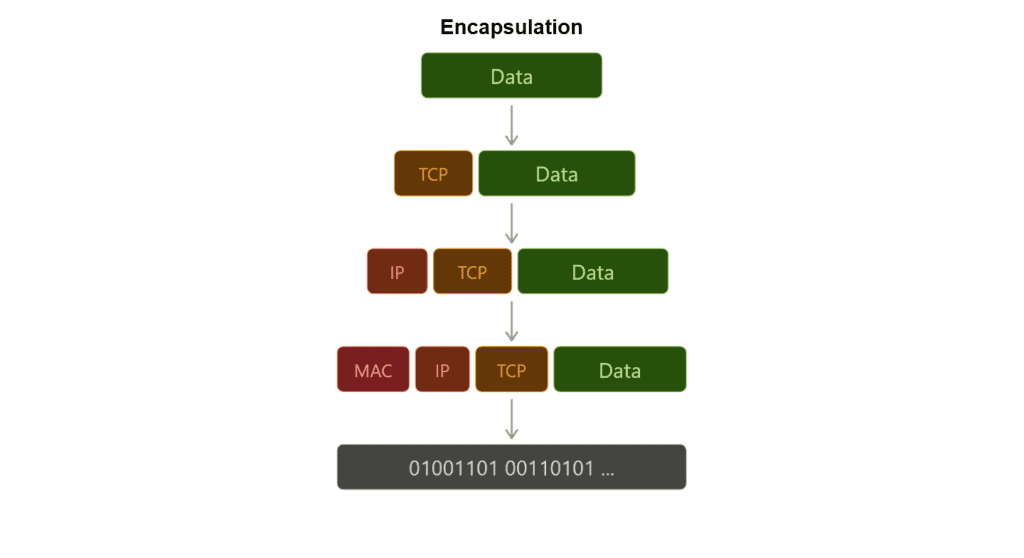
Using the OSI model as a reference, each layer takes the data it receives from the layer above it and wraps it with its own header before passing it down. At the sending side, this process continues from the top layer down to the physical transmission layer.
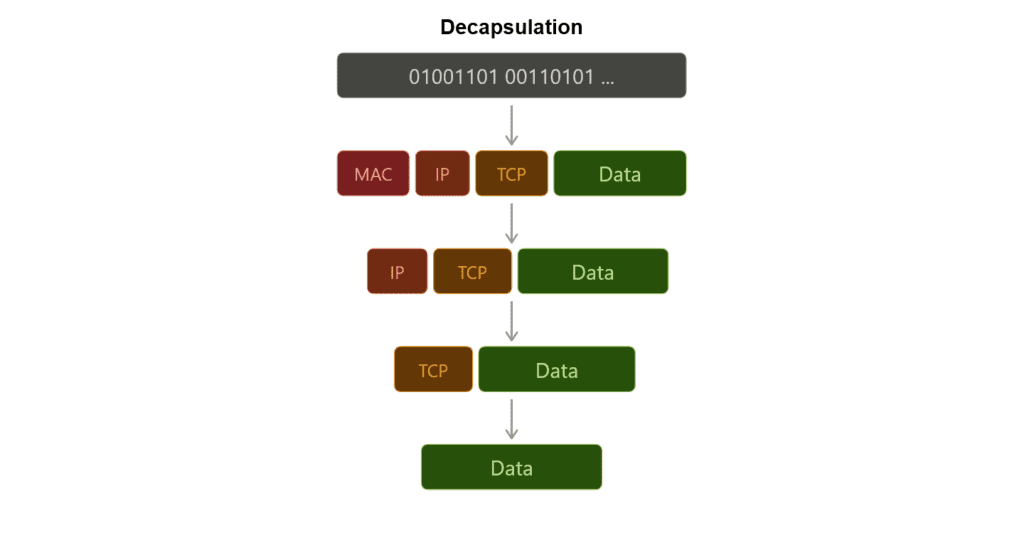
At the receiving side, the process is reversed. Each layer reads and removes its own header (decapsulation) and passes the remaining data up to the next layer until it reaches the application.
In this way, each layer only needs to understand its own header and responsibilities, while the data travels end-to-end through this layered wrapping process.
Ordering
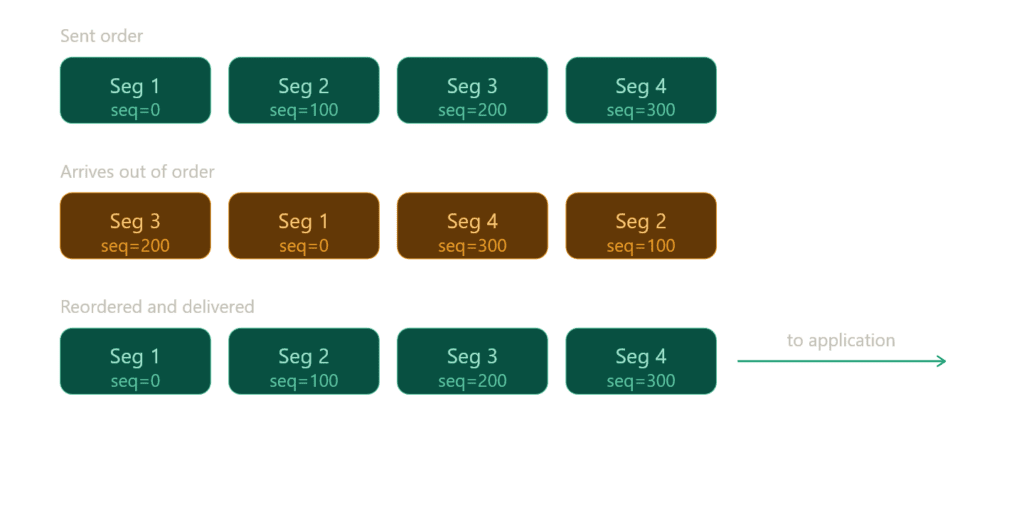
Finally, TCP has sent all the packets, but are they in the correct order? In practice, segments may arrive at the destination in a completely different order than they were sent.
TCP ensures the correct ordering of data by using sequence numbers. At the receiving side, it reorders all incoming segments based on these sequence numbers and reconstructs the original data stream.
Out-of-order packets are temporarily buffered until any missing segments arrive. Once all required data is available, TCP assembles everything in the correct order and delivers the complete content to the application.
Sometimes, the same segment may arrive more than once due to retransmissions. In such cases, TCP uses sequence numbers to: detect duplicates to discard them safely
This ensures that the final reconstructed data is clean, complete, and correctly ordered.
Under the Hood: TCP Congestion Control
TCP also adapts to network conditions while sending data.
When packet loss happens, TCP slows down to avoid making the congestion worse. When the network is stable, it gradually increases the sending speed again.
To do this, TCP uses built-in algorithms like slow start and congestion avoidance, which help it find a balance between speed and network stability.
Under the Hood: Byte-stream behavior
TCP does NOT send “messages” but sends a continuous stream of bytes.
The application writes data into TCP, and TCP treats it as one long stream rather than separate chunks.
Then TCP takes that stream and splits it into segments for transmission. These segments are just chunks of the same byte stream, not independent messages.
Because of the segment concept, you might think TCP sends separate pieces of data over time. But that’s not actually the case.
Under the Hood: TCP Buffers
Even though TCP behaves like a continuous byte stream, it does not send or receive data instantly. Instead, it uses buffers on both sides of the connection.
On the sending side, the operating system does not immediately push the data onto the network. Instead, it first places the data into a send buffer. From there, TCP decides when and how to transmit it based on network conditions, congestion control, and flow control.
On the receiving side, the operating system places incoming data into a receive buffer. This means the system may already have received the data even if the application has not processed it yet.
Because of this buffering system, application writes do not map one-to-one with actual network transmission. TCP may split a single write across multiple packets, or combine multiple writes into a single transmission.
This is one of the reasons TCP is called a byte-stream protocol: it delivers a continuous flow of bytes rather than discrete messages.
Connection Termination
Once you send the data, the TCP connection should be closed if it is no longer needed. Keeping it open unnecessarily can waste resources.
To close a connection properly, TCP uses a four-step termination process: FIN → ACK → FIN → ACK.
After this exchange, the connection does not close immediately. Instead, it enters the TIME_WAIT state to ensure the system properly handles any delayed or duplicate packets before fully releasing the socket.
Demonstrating TCP Connections with Python
For this chapter, I’m going to use sockets instead of Scapy because I don’t want to craft custom packets. Instead, I want to work with TCP the way real applications use it, through a ready-to-use implementation.
Client
Let’s start with the client side since it’s simpler.
import socket

c_socket = socket.socket(socket.AF_INET, socket.SOCK_STREAM)First, we need to create a socket. A socket is a software endpoint that allows two programs to communicate over a network. In simple terms, it is just a combination of an IP address, a port number, and a protocol (such as TCP or UDP). Together, these define a communication channel between two applications.
There are also raw sockets, which operate at a lower level and allow direct interaction with the IP layer, but developers do not commonly use them for typical application development.
AF_INET specifies the IPv4 address family, while SOCK_STREAM indicates a stream-oriented socket, typically using the TCP protocol (in this case it’s TCP).
c_socket.connect(("127.0.0.1", 6573))127.0.0.1 is the loopback IP address, which refers to the local machine itself. We commonly use it for testing because it allows applications on the same device to communicate without using an external network.
The number 6573 is a port number. We chose it randomly in this case, and other applications are unlikely to use it at the moment.
message = "Data here!"Now we have a string, but that doesn’t matter because it will ultimately convert into bits for transmission.
We won’t be able to observe how segmentation works, nor how the TCP handshake happens at a low level. However, we previously demonstrated that we can manually construct a handshake using Scapy.
We also won’t see how the receiving device orders packets, because TCP handles all of this automatically under the hood, including segmentation, sequencing, and reassembly.
c_socket.send(message.encode())encode() is used to convert a string into bytes, and the send() function is used to transmit that data to another machine (in this case, our own machine).
We still provide send() with bytes; it passes the data to the operating system’s TCP stack, which then handles transmission details such as segmentation, reliability mechanisms, and connection management.
c_socket.close()Close the connection once the job is done. Keep it clean and clear.
Server
Now we need to listen on the exact IP address and port to receive the message. We’ve switched roles, now we are the receiver.
import socket

s_socket = socket.socket(socket.AF_INET, socket.SOCK_STREAM)
s_socket.bind(("127.0.0.1", 6573))We are creating another socket, but this time instead of sending a message, we will listen on this port for incoming data.
s_socket.listen(1)
print("Server is listening...")We are only handling one connection, so we set listen(1). This sets the backlog queue size, which controls how many incoming connections can wait in line before they are accepted.
It does not strictly limit the server to a single connection; rather, it limits how many pending connections can be queued while the server is busy handling others.
conn, addr = s_socket.accept()
print(f"Connected by {addr}")Here, we are accepting a connection. conn is the connection object, and addr is the address tuple, which contains the client’s IP address and port.
accept() returns a new socket used for communication with the client.
The original socket (created with the socket() function) is only responsible for listening for incoming connection requests, not for actual data exchange.
When a client connects, the operating system creates a new dedicated socket object for that specific connection. This new socket represents a single communication channel between the server and that client.
data = conn.recv(1024)
print("Received:", data.decode())We are receiving the message here. If you are sending multiple messages (not just a single one), you need to iterate to keep reading incoming data continuously.
conn.close()
s_socket.close()We cleanly close both the connection and the socket.
First, run the server, then run the client script to send the data. You should receive the data in the other terminal that you use to run server script.
Conclusion
This article ended up over 2K words again. I don’t think I’m able to keep these articles short, although I’ve tried several times. While writing them, I often feel anxious about making structural mistakes or forgetting to introduce important concepts.
The articles also tend to grow quickly, which makes it harder to maintain a clear and consistent structure. Still, I did my best to keep everything organized and coherent.
The next article will be on User Datagram Protocol (UDP) with Python Sockets. I’ll explain UDP with practical examples. It should be easier compared to TCP since UDP is essentially a different approach to the same problem.
After the UDP article, I will share a mind map that brings all the concepts together in a visual format. This will help connect the ideas and make it easier to identify and fix any gaps or inconsistencies across the previous articles.
You can find the script used in this article on my GitHub account.