
We’ve already covered TCP and UDP for data transfer, and how the IP layer wraps them for transport. Now we’re going one layer lower, the link layer, where we need to talk about how IP addresses get mapped to MAC addresses.
You can find all the scripts used in this article, as well as the recommended order of articles for following the learning path, in this GitHub repository.
The Problem
When you send data across a network, you think in terms of IP addresses. You know the destination is 192.168.1.50, your OS knows it, your application knows it.
But IP addresses are a high-level abstraction, they exist so humans and software can reason about network locations. The hardware underneath has no idea what to do with them.
At the link layer, actual transmission happens between physical devices: network cards, switches, routers. These devices don’t speak IP. They speak MAC addresses.
A MAC address is a 48-bit identifier burned into every network interface card. It’s what the link layer uses to deliver a frame from one device to another, but only within the same Layer 2 network, also called a broadcast domain. Cross a router, and you’re in a different segment entirely.
Your packet has an IP destination, but your network card needs a MAC destination to actually send anything. Someone has to bridge that gap.
Think of it this way: IP is like knowing someone’s name. MAC is their physical address. You can’t mail a letter with just a name, you need to know where they actually live.
This is exactly what ARP solves. But here’s the catch: ARP only works locally. It’s a broadcast protocol, it shouts “who has this IP?” to everyone on the same subnet. That broadcast never leaves the network segment.
So before any packet goes anywhere, your machine asks one question: is the destination on my subnet?
If yes, ARP runs, gets the MAC, packet goes straight there.
If no, your machine doesn’t even try to ARP the destination. It ARPs for the default gateway (something that connects a local network to other networks) instead, hands the packet to your router (an example default gateway), and from there it hops across the internet, each router reading the destination IP and forwarding it along, rewriting the MAC addresses at every hop but leaving the IP untouched.
Until it reaches the last router. The one sitting in the destination’s home. That router is finally on the same local network as the target machine, so ARP runs one last time, resolves the MAC, and the packet lands.
Basically, IP gets the packet to the right house. ARP makes sure it reaches the right person inside.
Concept of ARP
Now that we understand the problem and how ARP addresses it, let’s take a closer look at the protocol itself, its design, and where it came from.
Address Resolution Protocol; RFC 826, published in 1982.
ARP lives between the network layer and the link layer. It’s not quite Layer 2, not quite Layer 3 (Well, personally I see it as Layer 2), it operates at the boundary, which is why it’s sometimes called a Layer 2.5 protocol. Its entire job is narrow and specific: given an IPv4 address, find the corresponding MAC address on the local network.
Notice that qualifier: IPv4. ARP is strictly an IPv4 thing. IPv6 doesn’t use ARP at all; it replaced it entirely with the Neighbor Discovery Protocol (NDP), which we’ll get to later. For now, everything here is IPv4.
ARP operates only within a single broadcast domain, meaning the same local network segment. It cannot cross routers. If your destination is on a different subnet, ARP doesn’t help you reach it directly. You ARP for your default gateway instead, and let routing take over from there. That’s an important constraint to internalize early.
The protocol itself is stateless and trustless. There’s no handshake, no authentication, no verification. Any device can send an ARP reply claiming any IP-to-MAC mapping, and the network will believe it.
That simplicity is what makes it fast and lightweight, and also what makes it exploitable, as we’ll see in the later chapter.
This article won’t cover ARP spoofing and poisoning in detail; there will be a dedicated article for that topic.
At its core, ARP does one thing:
The sender broadcasts to everyone on the segment: “Who owns 192.168.1.50? I’m 192.168.1.1, reply to me.”
The owner responds directly to 192.168.1.1: “That’s me, my MAC is aa:bb:cc:dd:ee:ff.”
That’s a broadcast, every device on the segment hears it. The device that owns that IP responds directly.
ARP Packet Structure
Every ARP message is 28 bytes. That’s the full size for IPv4 over Ethernet. No options, no variable length fields. Just 28 bytes with a fixed layout every device on the network knows how to read.
Let’s walk through what’s inside.
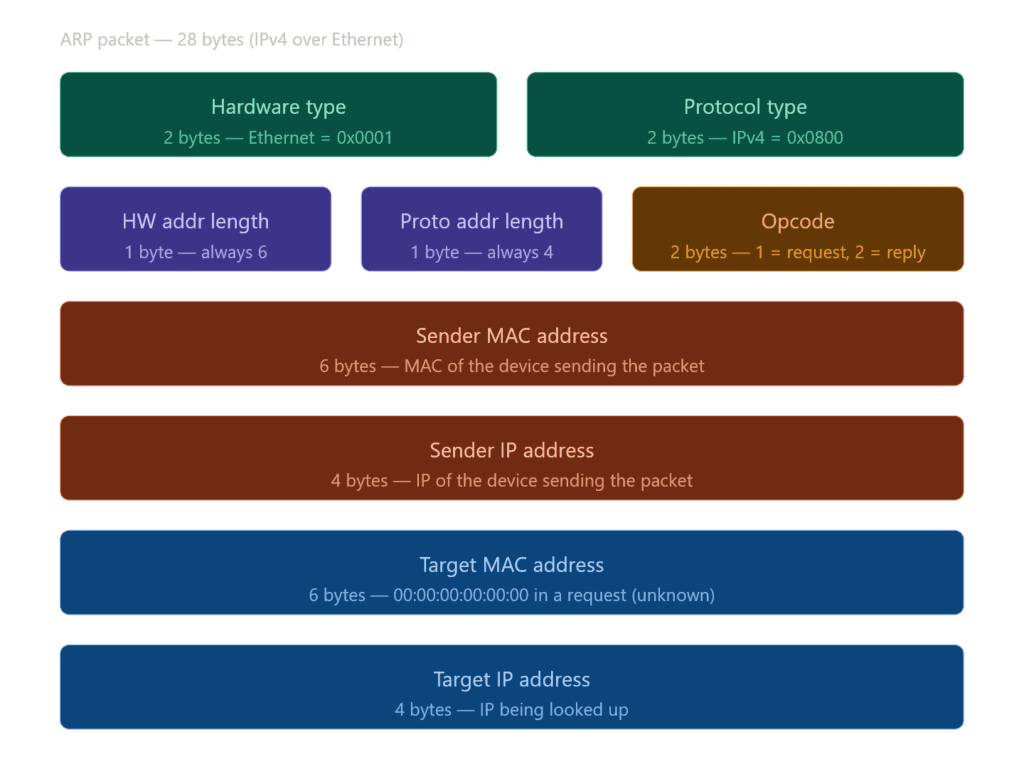
The first two fields : Hardware Type and Protocol Type, tell ARP what kind of addresses it’s working with.
Hardware Type says what link-layer technology is in use. In practice this is almost always Ethernet, the technology that physically connects devices on a local network, the cable going from your PC to your router. Even on WiFi, ARP still sees Ethernet, because the 802.11 wireless frame gets converted to an Ethernet-compatible frame before it ever reaches ARP. So the value here is almost always 0x0001.
Protocol Type, on the other hand, says which network-layer protocol needs resolution. For IPv4, that’s 0x0800, the same value you’d see in an Ethernet frame header.
Together, these two fields are what keep ARP general. Rather than hardcoding assumptions about the network, ARP reads them at runtime, which means it can technically operate over other link-layer technologies beyond Ethernet. That’s by design, the protocol was never meant to be Ethernet-only. Yet, unironically, it ended up being Ethernet-only in practice (which is true for most cases).
Next are Hardware Address Length and Protocol Address Length, one byte each. For Ethernet and IPv4 these are always 6 and 4, but the fields exist so the parser knows how many bytes to read for each address without making assumptions. If ARP runs over a different link-layer technology with longer MAC addresses, those values change accordingly.
Then comes Opcode, the most important field. It’s just a number: 1 means request, a broadcast asking who owns an IP. 2 means reply, a direct response with the answer. Everything else in the packet is context. Opcode is the intent.
The last four fields are the actual addresses. Sender MAC and Sender IP identify who sent the packet. Target MAC and Target IP identify who it’s directed at.
Building an ARP Packet with Scapy
Hands on example time, we really used to use scapy for all types of packets. Well that’s what scapy made for.
Requestor
from scapy.all import *

packet = Ether(dst="ff:ff:ff:ff:ff:ff") / ARP(
    op=1,
    hwsrc="personal:mac:address",
    psrc="192.168.1.1",
    hwdst="00:00:00:00:00:00",
    pdst="192.168.1.50"
)

# r : result
r, no_response = srp(packet , timeout = 2)

for sent, received in r:
print(f"IP: {received.psrc}, MAC: {received.hwsrc}")You can actually grab your machine’s IP and MAC programmatically, but that’s extra work so we’ll hardcode them for now and revisit later.
To build an ARP packet, we wrap ARP inside Ethernet, that’s always the starting point. Ethernet handles the link-layer delivery, ARP rides inside it.
Ethernet only needs one thing here: the destination MAC. Since this is a broadcast, we set it to ff:ff:ff:ff:ff:ff, every device on the segment will receive it.
ARP takes a few more fields:
op: 1 for request, 2 for replyhwsrc: your MAC address (the sender). This can be spoofed, which we’ll get into laterpsrc: your IP address, since you’re the one making the requesthwdst: destination MAC, unknown at this point, so we zero it outpdst: the IP address you’re trying to resolve
Once the packet is built, we send it out and listen for whoever replies.
You might notice we used srp instead of sr or sr1. The reason is the layer we’re operating on. sr and sr1 work at Layer 3, they expect IP packets. But ARP lives at Layer 2, so we need srp, which works directly with Ethernet frames. Same send-and-receive logic, just one layer lower.
Ethernet and ARP can be confusing, so think of it this way: Ethernet is the protocol that delivers ARP messages across the local network, while ARP is responsible for resolving IP addresses to their corresponding MAC addresses.
Responder
from scapy.all import *

packet = Ether(dst="ff:ff:ff:ff:ff:ff") / ARP(
    op=2,
    hwsrc="personal:mac:address",
    psrc="192.168.1.1",
    hwdst="00:00:00:00:00:00",
    pdst="192.168.1.50"
)

sendp(packet)
print(f"Reply sent to 192.168.1.50")For the reply script, the structure is identical to the request; same methods, same syntax. The only difference is op=2 instead of op=1, which tells the receiving device this is a reply, not a request.
Also, we use sendp() instead of srp() when we want to send a request.
Upgrade
Now let’s upgrade the script a bit. Instead of hard coding your IP and MAC, we’ll pull them automatically using two helper functions. We’re also adding some basic error handling, not exhaustive, but enough to catch the obvious failures without turning this into an error handling article.
from scapy.all import *
import socket

def get_ip():
    s = socket.socket(socket.AF_INET, socket.SOCK_DGRAM)
    try:
        s.connect(("8.8.8.8", 443))
        return s.getsockname()[0]
    finally:
        s.close()

def get_mac():
    try:
        return get_if_hwaddr(conf.iface)
    except Exception as e:
        raise RuntimeError(f"Couldn't get MAC address: {e}")

def arp_request(target_ip):
    try:
        ip  = get_ip()
        mac = get_mac()

        pkt = Ether(dst="ff:ff:ff:ff:ff:ff") / ARP(
            op=1,
            hwsrc=mac,
            psrc=ip,
            hwdst="00:00:00:00:00:00",
            pdst=target_ip
        )

        r, _ = srp(pkt , timeout = 2)

        for sent, recv in r:
            print(f"IP: {recv.psrc}, MAC: {recv.hwsrc}")

    except Exception as e:
        print(f"Error: {e}")

# Must be changed to ur target computer's local IP
arp_request("192.168.1.50")We start with two helper functions before anything else.
get_ip() opens a UDP socket and connects to an external address (you can change the address) and it doesn’t actually send anything, just tricks the OS into revealing which local IP it would use. We grab that and close the socket.
get_mac() uses Scapy’s get_if_hwaddr with conf.iface, Scapy’s default interface, whatever that is on your machine.
Then arp_request() pulls both, builds the packet, and sends it.
import socket

from scapy.all import *


def get_ip():
    s = socket.socket(socket.AF_INET, socket.SOCK_DGRAM)
    try:
        s.connect(("8.8.8.8", 443))
        return s.getsockname()[0]
    finally:
        s.close()


def get_mac():
    try:
        return get_if_hwaddr(conf.iface)
    except Exception as e:
        raise RuntimeError(f"Couldn't get MAC address: {e}")


def arp_reply(target_ip, target_mac):
    try:
        ip = get_ip()
        mac = get_mac()

        pkt = Ether(dst=target_mac) / ARP(
            op=2, hwsrc=mac, psrc=ip, hwdst=target_mac, pdst=target_ip
        )

        sendp(pkt)
        print(f"Reply sent to {target_ip}")

    except Exception as e:
        print(f"Error: {e}")

# Requester's IP and MAC
arp_reply("192.168.1.50", "aa:bb:cc:dd:ee:ff")To build the reply script, copy the request script and change op=1 to op=2, srp to sendp, and pass the requester’s MAC as hwdst instead of zeroing it out.
Note: To test these scripts you need two machines (or VM) on the same network, each with their own local IP. One runs the request, the other runs the reply.
Additional note: This reply script can be used for attack vectors, which is not the intended purpose here. We are only demonstrating how it works for educational purposes. Please do not use it on any system or network without proper permission.
The ARP Cache
Every time ARP resolves an IP to a MAC, the result gets stored locally in something called the ARP cache. The idea is simple: why broadcast the same question every time you want to talk to the same device? Just remember the answer.
The cache is a table your OS maintains in memory. Each entry maps an IP address to a MAC address, with a timer attached. When the timer expires, the entry gets dropped and ARP runs again next time that IP is needed.
- Windows
arp -a

- Linux / Macos
ip neigh192.168.1.1 aa:bb:cc:dd:ee:ff REACHABLE
192.168.1.50 11:22:33:44:55:66 STALEREACHABLE means the entry is fresh. STALE means the timer ran out but the entry hasn’t been cleared yet, it’ll be verified next time it’s needed.
Cache entries typically expire after a few minutes. The exact duration depends on the OS: Linux defaults to around 30 seconds of reachability before marking it stale, Windows holds entries longer.
This is also where ARP poisoning hits hardest. If an attacker can plant a fake entry in your cache, your machine will keep using it until it expires, sending traffic to the wrong MAC the entire time.
ARP poisoning is not our topic right now, so there’s no need to expand this article that much.
ARP Walkthrough
Let’s walk through exactly what happens when your machine needs to reach another device on the same network for the first time.
Say your machine is 192.168.1.1 and you want to reach 192.168.1.50. Your OS checks the ARP cache first, nothing there. So ARP kicks in.
Request
Your machine (or router) broadcasts an ARP request to the entire subnet:
Who has 192.168.1.50? Tell 192.168.1.1
The Ethernet frame has ff:ff:ff:ff:ff:ff as the destination, every device on the segment receives it.
Every device reads the packet. Every device except 192.168.1.50 ignores it.
Reply
192.168.1.50 sends a unicast reply directly back to your MAC:
192.168.1.50 is at aa:bb:cc:dd:ee:ff
No broadcast this time. Just a direct response.
Cache
Your machine stores the result in the ARP cache and the packet finally goes out with the correct destination MAC.
Every subsequent packet to 192.168.1.50 skips ARP entirely and uses the cached entry until it expires.
Gratuitous ARP
A gratuitous ARP is an ARP request a device sends about itself, no one asked for it. The sender and target IP are the same, its own IP, and it broadcasts it to the entire segment.
It looks like this:
Who has 192.168.1.1? Tell 192.168.1.1
Same IP on both sides.
Why the heck would your device do this? Valid question. There are a few legitimate reasons. When a machine joins the network or comes back up, it sends a gratuitous ARP to announce itself and update everyone’s cache with its MAC.
It’s also used to detect IP conflicts, if anyone replies to your own IP, someone else is using it.
The problem is the network trusts it unconditionally. Any device can send a gratuitous ARP claiming any IP, and every machine on the segment will update their cache accordingly.
Proxy ARP
Proxy ARP is when a device, usually a router, answers ARP requests on behalf of another device that’s on a different subnet.
Normally, ARP can’t cross routers. However, with Proxy ARP, a router can respond to a request for an IP address it knows how to reach by replying with its own MAC address. The requester has no way of knowing this, it simply receives what appears to be a valid reply and sends the packet. The router then forwards the packet to the actual destination.
It looks like this:
Who has 192.168.2.50? Tell 192.168.1.1
The router sits between the two subnets, knows 192.168.2.50 is on the other side, and replies:
192.168.2.50 is at router’s MAC
Traffic flows, nobody’s the wiser.
It was useful in older network setups where devices weren’t configured with a default gateway. Instead of fixing the configuration, the router just handled it transparently. These days it’s mostly disabled by default.
Attacks on ARP
Treat this chapter as an introduction, not a standalone section. I will expand on the content and provide more demonstrations, along with detailed theoretical explanations, in a separate article.
ARP was designed with one goal: speed. No authentication, no verification, no handshake. Any device can send an ARP reply claiming any IP-to-MAC mapping, and the network will believe it.
ARP poisoning is the attack that abuses this. The idea is straightforward, send fake ARP replies to a target and poison their cache with a mapping you control. Once their cache is corrupted, their traffic goes to you instead of the intended destination.
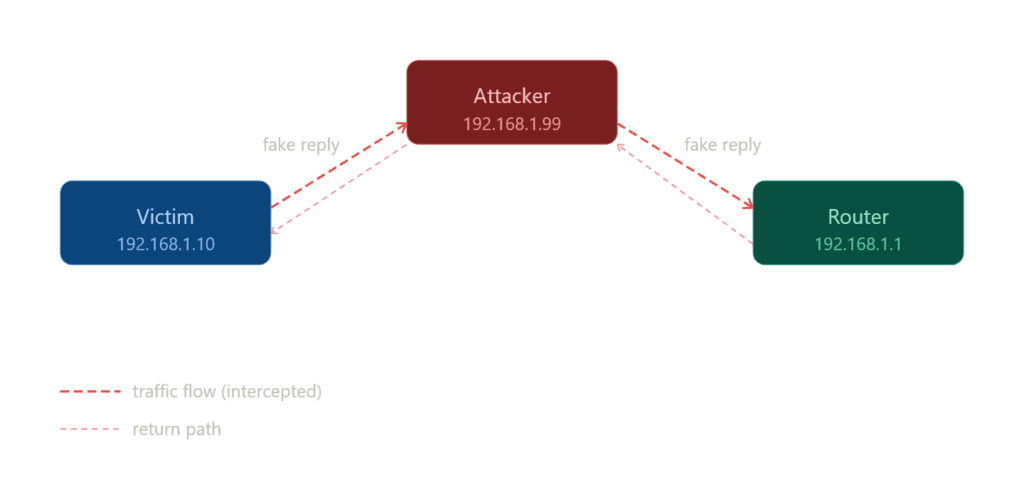
The classic setup is a man-in-the-middle attack. Say there are three devices on the network: a victim, a router, and an attacker.
The attacker sends two fake replies:
To victim: 192.168.1.1 (router) is at attacker’s MAC To router: 192.168.1.x (victim) is at attacker’s MAC
Both sides update their cache. Now all traffic between the victim and the router flows through the attacker’s machine. The victim thinks they’re talking to the router. The router thinks it’s talking to the victim. Neither has any idea.
The attacker can read everything, modify it, or drop it entirely. Full control over the traffic, completely invisible.
This works because ARP is stateless and trustless. There’s no way to tell a legitimate reply from a fake one at the protocol level.
ARP spoofing and poisoning will be covered in a dedicated article with a demonstration, so I will briefly skip over them here.
ARP vs NDP (IPv6)
When moving from IPv4 to IPv6, one of the key protocol changes is how devices resolve IP addresses to hardware (MAC) addresses.
In IPv4, this is handled by the Address Resolution Protocol (ARP), which we have discussed throughout this article.
In IPv6, ARP is completely replaced by the Neighbor Discovery Protocol (NDP).
Differences
In IPv4, ARP handles address resolution through a simple request and reply mechanism, operates as a standalone protocol, and relies on broadcast communication to reach all devices on the local network.
It has no additional capabilities beyond mapping IP addresses to MAC addresses.
In contrast, IPv6 replaces ARP with NDP, which performs address resolution using Neighbor Solicitation and Neighbor Advertisement messages, is part of the ICMPv6 protocol suite, and communicates via multicast rather than broadcast.
NDP also offers several additional features, including router discovery, duplicate address detection (DAD), and other network configuration functions, making it far more powerful and versatile than ARP.
Now you might be wondering what this wizard language is and it’s valid, because I haven’t actually prepared this article for NDP and there are many unknowns.
I’m going to prepare a dedicated article for NDP, so don’t worry! For now, just know that there’s another protocol that replaces ARP for IPv6.
Conclusion
I know there’s a lot to digest here, and some parts aren’t fully explained, covering everything in a single article is not easy.
I’m planning two dedicated articles next:
ARP Spoofing and Poisoning with Scapy: a practical guide to experimenting and understanding ARP attacks with bunch of theory.
Introduction to NDP (IPv6 Neighbor Discovery Protocol): to cover IPv6’s replacement for ARP and fill in the gaps here.
Even so, this article covers the core concepts of ARP and provides an overall picture of how the protocol works, which is the most important takeaway.
Next Up: ARP Spoofing and Poisoning with Scapy